How to Switch Your PS2 BIOS for Better Emulation in 2025
Though the PlayStation 2 (PS2) is old news, it’s after all the home to some big A-grade classics like Resident Evil 4, Final Fantasy X, and Tekken 5 that are still in demand and evoke excitement in 2025. Games can be played on PC, on Android devices, and more via emulators PCSX2, AetherSX2, and RetroArch. But if you’re experiencing crashes, bugs, or regional errors, you might need to check your PS2 BIOS. Upgrading to a newer or compatible BIOS can be the answer to your woes.
Well then, how do you change your PS2 BIOS for optimal emulation? With simple, legal procedures, this article will explain how to update the BIOS on your PS2 to improve compatibility and performance. We’ll help you get your emulator operating properly, regardless of whether you’re an expert at retro gaming or are just exploring the PS2’s vast catalog. So, let’s not wait further and get the ball rolling!
What Is a PS2 BIOS and Why Switch It?
The firmware that powers each PlayStation 2 system is called the PS2 BIOS (Basic Input/Output System). Consider it the central component of the console, handling functions such as:
- System startup and hardware configuration (CPU, GPU, RAM).
- Loading games from digital ISOs or CDs.
- Managing functions such as region settings and memory card saves.
You should know that emulators use the PS2 BIOS file to copy the functionality of your console so that it can precisely recreate the original PS2 gameplay. Since PS2 models have distinct BIOS versions (e.g., SCPH-10000 and SCPH-70012), using old or incorrect BIOS files might lead to problems like region lockouts or game crashes.
Updating the BIOS of your PS2 emulator entails swapping out the current file for a more recent or region-specific one that you got from your original PS2 console. This is not a matter of updating firmware like a software patch (no BIOS update is provided by Sony), but rather to employ a more appropriate one to enhance:
- Game Compatibility: More games are supported by more recent BIOS versions, which also lower error rates.
- Performance: Games like Shadow of the Colossus will run more smoothly and load more quickly.
- Region Support: Lockout problems are prevented with a BIOS that is compatible with the region (for example, NTSC-J for Japanese games).
- Emulator Stability: More recent BIOS versions are ideal for modern emulators.
Why Switch Your PS2 BIOS?
Switching your PS2’s BIOS is worthwhile because of the following:
- Solve Compatibility Issues: More contemporary games may not be compatible with older BIOS files, such as SCPH-10000, which might cause freezes or blank displays.
- Improve Performance: The SCPH-90001 and other more current BIOS versions improve emulator performance, especially for demanding games.
- Games Region Syncing: A BIOS from the same region as your game (NTSC-U, NTSC-J, or PAL) guarantees fluid gameplay.
- Improve the Features of the Emulator: More recent BIOS files are more compatible with the sophisticated graphics of PCSX2 or the mobile optimization of AetherSX2.
Legal Considerations: Dumping a PS2 BIOS
It is necessary to legally dump a fresh BIOS file from a PS2 console you own if you want to switch the BIOS on your PS2. Due to Sony’s copyright protection, downloading the PS2 BIOS from the internet is prohibited and dangerous, since it may expose your device to viruses or damaged data. To lawfully dump a BIOS:
- Tools needed: A PS2 console, a USB drive, a free McBoot memory card, and BIOS Dumper software are necessary.
- Create a Free McBoot Account: To enable homebrew tools, install Free McBoot (for instructions, see retro gaming forums).
- Empty the BIOS: To save the BIOS file (such as SCPH-70012.bin) to your USB drive, run the BIOS Dumper.
- Check for Integrity: Make sure that the file is legitimate by using an MD5 checksum tool.
If you have more than one PS2 console (e.g., an early SCPH-30000 and a slim SCPH-70012), dump BIOS files for both so you have alternatives. This guide is only for those with a legally dumped BIOS file available.
Step-by-Step Guide to Switching Your PS2 BIOS
You can easily update the BIOS on your PS2 by replacing the existing BIOS file in your emulator with a more recent or region-specific one. Here are detailed instructions for PCSX2, AetherSX2, and RetroArch.
1. Changing the PCSX2 PS2 BIOS (Windows, macOS, Linux)
The industry standard for PS2 emulation is PCSX2, which offers versatility by supporting numerous BIOS files. To swap, follow these steps:
Step 1: Examine your current BIOS
- Navigate to Config > Plugin/BIOS Selector > BIOS after starting PCSX2.
- Make a note of the BIOS version that is currently in use (e.g., SCPH-30000) and note any problems (e.g., region errors, game crashes).
Step 2: Get a fresh BIOS
- Use Free McBoot and BIOS Dumper to dump a more recent or region-specific BIOS from a PS2 console that you possess (such as the SCPH-70012 for NTSC-U).
- Use an MD5 checksum tool to make sure the file isn’t corrupted.
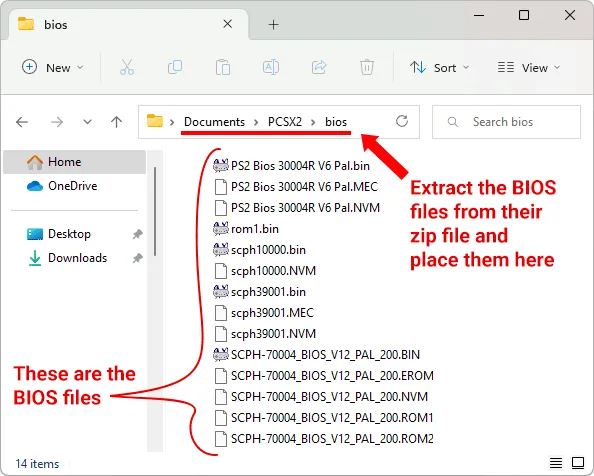
Step 3: Insert the fresh BIOS
- Find the folder containing the PCSX2 bios:
- MacOS/Linux: ~/.config/PCSX2/bios
- Windows: Documents/PCSX2/bios
- Copy the updated BIOS file (such as SCPH-70012.bin). Store the previous BIOS in a different folder as a backup.
Step 4: Choose the updated BIOS
- Go back to Config > Plugin/BIOS Selector > BIOS in PCSX2.
- Navigate to the list and pick the updated BIOS (such as SCPH-70012) from it.
- Once you have clicked “Apply,” it’s time to restart PCSX2.
Step 5: Examine the switch
- To test for better compatibility or performance, load an ISO file of a PS2 game that has been legally ripped from your disk.
- To make sure the updated BIOS functions better, test a few different games.
Pro Tip: For the newest features of PCSX2, try the most recent BIOS versions, such as SCPH-70012 or SCPH-90001.
2. Changing the PS2 BIOS on the Android AetherSX2
AetherSX2, which offers console-quality emulation, is a great option for Android. To change the BIOS, follow these steps:
Step 1: Find your current BIOS
- Navigate to Settings > BIOS after opening AetherSX2.
- Examine the existing BIOS file (such as SCPH-50001.bin) and record any problems, such as region inconsistencies or lag.
Step 2: Get a fresh BIOS
- Use Free McBoot and BIOS Dumper to dump a more recent BIOS from a PS2 console that you own, such as the SCPH-90001 for NTSC-U.
- Use USB or cloud storage to move the file to your Android smartphone. If it’s zipped, use a program like ZArchiver to extract it.
Step 3: Replace the BIOS
- Go to Internal Storage/AetherSX2/bios to locate the AetherSX2 bios folder.
- Copy the updated BIOS file (such as SCPH-90001.bin) to this folder. Move the outdated BIOS to a safe place.
Step 4: Set up the updated BIOS
- Navigate to Settings > BIOS > Choose BIOS File in AetherSX2.
- Choose the updated BIOS file by navigating to AetherSX2/bios.
- Save all your settings.
Step 5: Confirm the change
- To test the updated BIOS, load an ISO of a PS2 game.
- Seek out improved region errors, fewer glitches, or more fluid gameplay.
A Helpful Tip: If you are longing to benefit from optimal AetherSX2 performance, use a smartphone with a Snapdragon 855+ and a more recent BIOS, such as SCPH-70012.
3. Change the PS2 BIOS on RetroArch (Windows, macOS, Linux, Android, iOS)
RetroArch requires a BIOS to allow PS2 emulation through experimental cores. To swap, follow these steps:
Step 1: Examine your current BIOS
- Go to Settings > Directory > System/BIOS after launching RetroArch.
- Pay attention to any compatibility problems, if any, and the current BIOS file (such as SCPH-10000.bin) in the system folder.
Step 2: Get a New BIOS
- Use Free McBoot and BIOS Dumper to dump a more recent BIOS from a PS2 console that you own (such as the SCPH-90004 for PAL).
- Use an MD5 checksum tool to confirm the integrity of the file.
Step 3: Install the updated BIOS
- Find the system folder for RetroArch:
- Android: Internal Storage/RetroArch/system
- Windows: C:\Users\[YourUsername]\AppData\Roaming\RetroArch\system
- iOS: depends on the program that is sideloaded.
- Copy the updated BIOS file to this folder. Make another backup of the previous BIOS somewhere else.
Step 4: Modify Core Settings
- Select Main Menu > Load Core to load your PS2 core (such as an experimental or PCSX2-based PS2 core).
- If necessary, make sure the BIOS path refers to the updated file under Core Options.
- Don’t forget to save the basic configurations.
Step 5: Examine the updated BIOS
- To test for enhancements, load an ISO of a PS2 game.
- Because RetroArch’s PS2 emulation is not as well-developed as PCSX2, expect experimental performance.
A handy tip: For best performance, try lightweight games, such as Crash Bandicoot, with more recent BIOS versions like SCPH-90001.
Troubleshooting Common BIOS Switch Issues
Keep in mind that switching BIOS files is not always a smooth sailing; you might experience certain issues sometimes. Here are troubleshooting tips for some common issues:
“BIOS Not Found” Error
Cause: Either the new BIOS file is compressed or missing.
How to Fix: Verify that the file is unzipped and in the appropriate location (PCSX2/bios, for example). Verify the emulator’s parameters again.
Black Screen or Game Crashes
Cause: Incompatible or corrupted BIOS.
How to Fix: Try a different BIOS version (like SCPH-70012) or re-dump the BIOS. Get the most recent version of the emulator.
Region Mismatch Issue
Cause: The reason for the region mismatch error is that the game and BIOS regions are not aligned (NTSC-U BIOS with PAL game, for example).
How to Fix: Make sure the BIOS matches the region of your game. For flexibility, have several BIOS files on hand.
Performance problems or lag
Cause: Inadequate hardware or subpar emulation settings.
How to Fix: Turn on speed hacks, lower the resolution, or use PCSX2’s Vulkan rendering. Make sure your device satisfies emulator requirements.
Tips for a Successful PS2 BIOS Switch
- Pick More Recent BIOS Versions: SCPH-70012 or SCPH-90001 files work better with contemporary emulators.
- Sync with Regions: To prevent issues, make sure your BIOS is from the same region as your game (for example, NTSC-J for Japanese titles).
- Archive Old BIOS: Maintain duplicates of all BIOS files in case you need to go back to any of those.
- Update Emulators: For improved BIOS compatibility, use the most recent versions of PCSX2, AetherSX2, or RetroArch.
- Test a Variety of Games: Check to see whether the updated BIOS enhances performance in all of your games.
Why Legal BIOS Switching Matters
For safe and moral emulation, a legally discarded PS2 BIOS is essential. Unauthorized BIOS file downloads put users at risk for viruses, legal concerns, and unstable performance. You can safeguard your device, respect Sony’s copyright, and express respect to the PS2’s heritage by dumping your own BIOS.
Final Thoughts: Enhance Your PS2 Emulation Experience
In 2025, changing the BIOS on your PS2 will redefine emulation by enabling improved compatibility and fluid gameplay for games like God of War II. This detailed yet easy guide offers the legal, step-by-step technique for upgrading your BIOS and addressing emulation issues, regardless of whether you’re running PCSX2, AetherSX2, or RetroArch. Take these actions, fix any issues, and return to the recognizable PS2 world.
What do you think now? Prepared to improve your vintage gaming? Change your BIOS properly and enjoy a chic return to the PS2 generation. Have a blast while playing!
